Sunday, July 29, 2012

Stockings Unstumped!

One of the best things about living in the greater D.C. area is that there is an unbelievable wealth of curatorial expertise here. I know a few people who study costume, so I sent out my stocking inquiry in case one of them could tell me whether the socks were hand knit or frame knit. Fortuitously, a friend of a friend had been to some sort of gathering where frame knitted stockings were a major topic. My friend, Mary Doering, and her friend, Carol Kregloh, and I had already planned to meet up for a "costume party" (we brought old clothes to study and then we went to an exhibit of paintings with period costumes), so the right person arrived in my network of connections at the right time. Mary is a collector who uses her costumes to help small museums install clothing exhibits, and she also teaches courses on costume for the Smithsonian's decorative arts program with George Mason University. Carol is a costume specialist at the National Museum of American History, and she has a vast mental library of clothing knowledge, including a volume on the history of socks. 
Carol Kregloh's expert hands show me what I need to know to recognize how the stockings were made.

The raised rows of stitches are knit, and there is no seam allowance. This rules out frame construction.


Detail of the edge finish on the stocking.  
Here's what I learned: The stockings are completely hand knit. Frame knit stockings have a seam where they are sewn closed, not knit closed. If my socks were made on a frame, they would have a seam allowance where the two sides met. The line of stitches on my stockings that looks like a seam is not a seam allowance, and it is knit, not sewn. I think Carol said that the raised stitch line was used to help with row counting, though I'm not sure I fully understood that part. As for the inscribed date "1819", both Mary and Carol were of the opinion that this indicated something commemorative. For example, the stockings may have been made especially for a wedding. They told me the date is really rare. Rare is good. Happy me!


I am so grateful. Both Mary and Carol were so generous with their expertise, and of course I'm grateful for having received the gift of the stockings in the first place. With this kind of support, I'm hopeful that I can really put my collections to good use.  


Saturday, July 21, 2012

Stocking Stumper

One of my mother's quilting buddies recently gave me a clothing collection she accumulated over the years. She is more interested in quilts and sewing tools, and her children are not into the old clothes, so I happily accepted this gift. More than happily, actually- I seriously can't believe my luck. Sometimes I find myself giddily hugging this stuff like toddler with a new teddy bear. I contained myself as best I could when I went to pick the collection up because I didn't want to seem greedy, and I knew I didn't do anything to deserve a whole collection falling into my lap. Now it's mine though, and words don't really describe how I feel. Picture someone with a stupid grin, hands clasped at her chest, hopping from foot to foot a little, and making a high-pitched noise that sounds something like, "Squeeeee!" That's me. Because the day I can afford a pair of knit stockings dated "1819" on my collecting budget is unlikely to ever arrive, and yet I have some! There are other exciting pieces, too, but I'll feature those later.

These stockings are on my mind lately because my museum, Jefferson Patterson Park & Museum, has a War of 1812 event and we are putting together a little exhibit on clothing and accessories that will include the stockings.

The stockings have integrated reverse knitting that reads, "S. B. 1819"

As we think ahead to exhibit text, there has been a little debate about how they were made. I know nothing of knitting or knitting history, but my colleagues do. One thinks that the stockings were knit by hand for personal use, and she bases her assertion on the construction and the presence of the initials "S.B." and the date 1819. Another colleague says there was an active home industry, especially for stockings, where the knitting was done on a frame. She feels that it would be easy to custom-order the personalized stockings from a professional. Since these were purchased from an antique dealer in Pennsylvania, there's little hope of determining who S.B. was, so our best chance for learning more is to look into stocking manufacture trends in general.


Overall view of the foot.

This detail shows the connection of the heel and calf area, as well as the zig-zag pattern knitted into both sides of each stocking.


I figure that if you can tell whether stockings were made by hand versus on a frame, this side seam connection  may be the key. Then again, maybe hand-made and frame-made stockings have the same kind of seam. I hope to find out.

The toes have been mended several times over. The mends appear to be period rather than recent.
I'm equally enamored of the stockings no matter how they were made, but I enjoy exploring the history. Anyone out there have specialized knowledge of 19th-century stockings to share? 

Sunday, July 15, 2012

Something Blue

So it turns out I'm not the only one with happy memories of going through boxes and bags from Nanny's closet and discovering old clothes with Grammy Rivers. My cousin Tina, who found Nanny's portrait dress after we dismantled the closet, has fond memories of the happiness she and Grammy shared when they realized what it was. Apparently it was in an old bag, and since Grammy was mostly blind, she had thought it was a set of crusty old curtains. More recently, Tina's discovery skills struck again as she and my mother stumbled on this blue ensemble when they were helping clean out Grammy's house. This dress is from about the same time period as the portrait, c. 1900-1908. I'd never seen this one before though, despite all of my explorations, which is a testament to the unknown depths of the things stashed away at Grammy's house. Sadly, some mice found this dress before we did. They had nibbled on the hem and a cuff and are probably responsible for some staining on the skirt. The rest is in excellent shape though, and as is often the case with dresses from Grammy's, we have extra fabric if we want to repair it. The extra material suggests that this is either a "Nanny original," or it was made by Nanny's mother. 


These images show off the fabric print and trim. The extra fabric is shown slung over the shoulder on the right.  I am sure that Nanny's sewing skills are the reason we still have so many of her dresses. A garment like this includes a lot of yardage, and no seamstress worth her salt throws out that much fabric. Nanny altered a number of dresses instead of throwing them out. I'm grateful that she never got around to dismantling this one though; it is completely original.

The ensemble has two pieces, a skirt and separate bodice with an unlined black lace neckline. I think it also would have been worn with some kind of waist-cinching belt and a separate high collar.The fabric is either silk or highly-polished cotton with black velvet trim. The skirt is slightly trained with a double row of ruffles at the hem. A linen lining with central hooks and eyes is sewn into the bodice. 

The bodice is gathered to create the tummy poof that was so popular in the early 20th-century. The lining was form- fitting though, to help maintain the overall structure of the look. The lining closes at front with hooks and eyes, while the outer bodice hooks at the side and shoulder with hooks and thread loops. The bodice detail at right shows the pin tucks on the sleeve and the tight cuff outlined in black velvet ribbon to give it the look of a belt.

The sleeves have a series of pin tucks that stop above the wrist to create a flare before they end in tight cuffs. This is the kind of detail that seems to be characteristic of Nanny's sewing, especially for the dresses she made in the 1920s and 1930s. She never seemed to skimp on the detailed stitching, even though she preferred busy prints that obscured all that hard work. I try to take pictures of these details, which is why I have so many shots of this dress. The photos don't show off all of that detail though, especially if you get the whole front and back in the image as shown below, so it's even more striking in person. Many thanks to Tina and my mom for rescuing this so that we can all enjoy it as a gorgeous example of our ancestor's taste and sewing skills.  


Wednesday, July 11, 2012

Nanny's 1906 Portrait Dress


Those of you who have been reading along might remember the amazing portrait I posted when discussing Nanny's closet. I'm sure you can imagine how anxious I was to find the dress from that portrait. But alas, I did not find it, and returned to school in upstate New York confident that it hadn't survived.

Since I was a kid when we went through the closet, I didn't have many qualms about the mess we made in the process; I was way too busy loving the treasure hunt. I think Grammy's curiosity had been triggered, too. I remember her often saying, "Huh, I've never seen that before." So she was totally nonchalant about having everything out even though we had trashed Nanny's former bedroom by using it to drop all the stuff we displaced to reach the closet's depths. When my vacation ended, I left without helping to put anything away.  As I'm sure you can imagine, subsequent visitors to Grammy had a "What the Hell happened here?" kind of reaction to the disaster. Someone seems to have continued the exploration though, because when I next visited Grammy, the room was still a mess, but it was configured differently and the goods removed had multiplied. More importantly, however, I was informed that the portrait dress had been located!

I rushed up the stairs and demanded direction to the dress in question, and was unbelievably deflated when I saw it. It looked like a mass of stiff yellowed paper. And not only did it look bad, but it was clear that there was NO WAY I'd fit into it. My disappointment was complete. I concluded, with all of my teenage knowledge, that it had probably been starched like crazy and stored that way, leaving it to shrink and become brittle over time. I took pictures in 2000, but remained unimpressed.

Even when we spread out the portrait dress for photos in 2000, it looked shriveled, yellowish, and generally not as fabulous as I expected it to be.  


Well, last week I was up in Maine and this time I was armed with two dress forms, a backdrop, a petticoat wired to help a trained skirt take its intended shape, and most importantly, a hand-held steamer! My aunt Joy inherited the portrait and the dress to go with it, so she brought it over for a photo shoot. Sadly, the original matching lace belt has not been located, so I substituted with another gathered belt from the collection that was period appropriate. The fabric is still yellowed, but it no longer looks like old shredded paper. So here it is: the dress Georgiana Mayhew Duncan wore in the portrait made when she graduated La Salle in 1906, front, back, side, and in detail. Now I can finally say that I'm impressed. Who wouldn't love this delicate frock?


Saturday, June 16, 2012

The Tissue Issue


In keeping with the theme of costume care, here’s a little briefing on tissue paper. Anyone who has read anything about proper costume storage knows that acid-free tissue is key. Whatever your choice of container, your costume collection will be happiest if each garment is wrapped in and/or fluffed out with acid-free tissue. So let’s dissect the tissue issue.

Acid-free tissue is an ideal packing material for costume collections. It can protect the fabrics by lining boxes, separating garments of different materials, and padding areas that are prone to folds or wrinkles that can weaken fibers. Also, if there is a sheet of tissue under a garment, you can get it out by lifting the tissue, minimizing handling and potential harm. 

Issue #1: Can you get acid-free tissue in the gift-wrap aisle of your local dollar store, or do you need to go to a museum or archive supplier? I’m afraid I don’t really know the answer to this one. Tissue paper is made by so many providers for so many different reasons that for all I know, archival suppliers pump up the price when the stuff you find at your local box store would be just fine. But do you want to take that risk? If the paper turns out to be acidic, it will yellow and become brittle, it may cause acid burns, brown spots, and staining on your costumes, and worst of all, the acidic environment will make your costume more brittle, so that the next time you go to take it out, it will be far more likely to rip, drop a bead, or pop a thread.


This is a detail of a corset that was stored in its original box for over a hundred years. Late 19th-century corsets were  rolled in long, skinny acidic boxes, and you can see where the bottom of the corset stuck out when the piece was rolled because the exposed portion has rust colored acid burns.  

Ph pens are cheap, and well worth the
investment.
Issue #2: Once you get some tissue, how do you know if it's acid-free? There are a few options to deal with the unknown here. First, you can order only from reputable archival suppliers like Gaylord Brothers (http://www.gaylord.com), Hollinger Metal Edge (http://www.hollingermetaledge.com/),  or Light Impressions (http://www.lightimpressionsdirect.com/). Such companies rely on their reputation for professional archival products, so you are unlikely to get bad acid-free tissue from them. The other option, which may be a cheaper route, is to get a Ph indicating pen (like the one shown here from Gaylord Brothers). It looks like a Sharpie, but its ink will turn yellow on acidic paper, and best of all, it costs less than $10 and you can use it to evaluate all kinds of packaging materials. If you have the Ph pen, you can try getting paper from different sources and evaluate as you go. Anything that makes the ink turn yellow should be relegated to gift bags, not costume storage.

Now think back to your high school chemistry class or read a refresher on Wikipedia and consider what the opposite of acidic is. If something isn’t acidic, it’s either neutral or alkaline, right?  Costume collectors know that acids are bad, but does that mean neutral or alkaline is good? This one I do have the answer to, but it’s complicated. You have to think about what your costume is made of in order to make this decision.  If you don’t have the time to keep reading, just go with Ph neutral acid-free tissue and avoid “buffered” tissue which is slightly alkaline. If you want the full dose of wisdom I have to bestow, read on…

Costumes can have a LOT of components beyond fabric, like beads, metal, fur, and feathers. The main question I suggest you consider is this: is it plant, animal, synthetic, or mineral? Plant materials might benefit from the alkalinity offered by buffered tissue, but animal products will actually do better in a slightly acidic environment. Minerals and synthetics can go either way.  If you’ve never thought about an outfit this way, here are some of the most common materials for cloth, buttons, and decorations:


According to the classes I've taken, buffered tissue should only be used for items that are all “plant,” and I don’t have many things that fit that category. In fact, much of the time I am at a loss when I try to identify the material, especially with my dresses from the 1920s-1940s which are often synthetic. So as a rule, I just always use acid-free tissue, not buffered tissue. It’s rare that a garment is only made of one thing, and it can be impossible to create an ideal environment for every element. I have a hard enough time getting motivated to put everything away properly, so adding an extra step of separating the costumes by material would just be counterproductive. If you're not as lazy as I am, get both acid-free and buffered tissue and keep your "plant" and "animal" pieces separated.

Saturday, March 17, 2012

The Evil "Agents of Deterioration"


Cue the soundtrack from the shower scene in Psycho, it’s time to talk about how the whole world is out to destroy every thing you hold dear. This will be a lesson in the preventive conservation of objects. In other words, the idea is to keep your collections from getting hurt so that they don’t need to be fixed down the road.

But first, let’s go over what I mean by “conservation”. Most people who hear this word think of environmental groups preserving rainforests or saving whales. The conservation I’m talking about is different; it’s to do with saving the things that people make. Art conservators work on paintings, sculpture, and other media, paper conservators treat documents and books, textile conservators treat cloth- you get the idea. I am not a conservator, but as a curator I have to be aware of threats to the things I’m responsible for, and I have to recognize when something is in distress and needs to be treated by a conservator.

Now before you read any further, please be aware that this can be a scary eye-opening topic for people who really care about their possessions. As someone who started collecting antiques at an early age, I was horrified when I got to grad school and learned how inherently unstable my beautiful purses and costume pieces really were. I lost sleep. I stopped buying collectibles and started buying special packaging for those collectibles instead. In other words, the bubble of fun that had previously surrounded my collecting behavior went “pop!” and now I can’t look at my collections without a degree of worry. If you would prefer to stay in Neverland, do not read on.

The things that conspire to destroy your material goods are known in the conservation world as “Agents of Deterioration.”  Everyone has observed them in action, but by then it is often too late to do much about it. So if you want to take steps to protect your precious possessions, here is a list of things to consider.

Agents of Deterioration

1)     Theft. If people steal your stuff, you lose, and who knows what condition your stuff will be in if you manage to get it back. Museums fight this with security personnel or alarms. At home, you can get a security system, or maybe a mean dog.

I wish I knew who this mysterious mustached man
was, since this picture was found in Grammy Rivers'
house and I presume he's a relative. Sadly, he is
now my poster-child for water damage, most likely 
the result of a roof leak. Note the staining that 
crosses his debonair face. Major bummer.
2)     Fire. The same kinds of fire prevention techniques you apply for your own safety usually help to protect your objects, though if you have a sprinkler system, see hazards of flood below. If you REALLY value something, plan to be able to grab it on your way out the door without having to run into a burning room. Better yet, put it in a fire-safe container or get a safety deposit box. If what you really value is an inlaid wardrobe or your carved antique bed, you’re screwed, so move on to things you can actually do something about.

3)     Flood. Water damage can be really devastating to objects, especially metals and organics. Oh wait, that’s pretty much everything, isn't it? So how do you work around it? Well, not living in a flood zone is a start. If the nearby river overflows there’s not much you can do but move things to higher ground, so hopefully you have a second story with some extra space. For smaller crises, like frozen pipes or overfilled bathtubs, there are little alarms you can buy that sit on the floor and go off like a smoke-detector if they get wet near something you want to protect. Simply enclosing your precious items in sealed plastic containers is not necessarily protective though, so if your mind jumped straight to the as-seen-on-tv ‘space bags’ or plastic bins, think twice. If any water gets in a plastic container, it will have entered a container that wants to trap it. That leads to moisture retention and mold and it can hurt more than it helps. Also consider this: flood insurance is a good idea for your home, but might not help you with precious collections. I doubt it covers professional conservation treatment of water-damaged art, photos, textiles, or furniture. And how do you replace one-of-a-kind heirlooms? You may need a specific rider on your home-owners insurance if you can get one.
Carpet beetles (left) and moths (right) are among the most common pests 
that damage historic costumes. Carpet beetles eat plant matter, like 
cotton and linen, while moths tend to prefer animal products like wool.

4)   4)  Pests. Mice, bugs, mold, and other pests may find your beloved heirlooms ever so tasty. Pests gather where there are food sources, and pretty much anything organic may be a food source for some kind of critter. Pests generally prefer environments with some warmth and humidity, and since people also prefer environments with some warmth and humidity, most of the things we live with are at risk. Pests will vary a lot depending on whether your collection offers a nice nesting spot (as is the case with clothes), or a tasty meal (as is also the case with clothes). Keep an eye out for droppings, little holes accompanied by powder of some kind, and of course the pests themselves. If you find pests, don’t go straight to a chemical solution for killing them. Chemicals can hurt your possessions as much as they hurt the bugs living in them. The same goes for mold. Mold loves humidity and dark, so if your closet is closed off from light and the air-conditioner, be afraid, very afraid, to put anything organic in there that mold might prey on. If you do find mold, don’t just spray some chemical cleaner on it. My favorite mold killer is sunlight, when used in moderation. Overall though, I have yet to figure out how to make my home collections pest-proof, so mostly I just keep watch so that the creepy-crawlies can’t get a strong foothold in my storage areas. Also, if you got a mean dog in response to #1, keep an eye on him, too.

This is one of the purses that Grammy Rivers gave me when we Found it in 
Nanny's closet (story here). Unfortunately, damp conditions in my house 
have caused a mold breakout on the cord. A close-up of the fuzzy white stuff 
appears on the right.
5)   Relative humidity (Rh) and Temperature. Different materials respond differently to changes in relative humidity. Any organics (things made from plants and animals) are likely to be hydroscopic, which means that they absorb moisture from the air. For example, wood expands and contracts as it absorbs or releases moisture into the air. Dramatic changes in temperature affect relative humidity. Hot temperatures allow more moisture to be retained in the air, while cold temperatures can cause condensation and dry air. Fluctuations in Rh and temperature can mess with your favorite possessions in a few ways:
  • First, as a rule, expansion and contraction is not good. These are the forces that cause roads, varnish, paint, and pretty much everything else that cracks to crack. Cracks indicate mini-breaks where previously things were not broken. Not good. Not always fatal either, but when expansion and contraction occurs over and over as seasons change and objects age, the forces take a cumulative toll.
  • Second, high temperatures and moist air speed up chemical reactions. So let’s say you have some brass heirloom jewelry. Metals like brass do not absorb moisture, but if they are exposed to damp, they are more likely to corrode. In the case of brass, corrosion is usually green because of the copper in it. The warmer the air, the faster the chemical reaction that causes corrosion.
  • Third, warm moist environments promote mold and make life comfy for other pests as well.
  • Finally, each material that goes into making an object might have its own sweet spot for the perfect Rh/temperature. For example, books get moldy if too moist, and brittle if too dry. But what if your object is a composite? For example something like a pair of shoes might suffer damage as wood soles and leather uppers expand and contract at different rates (see inherent vice below).
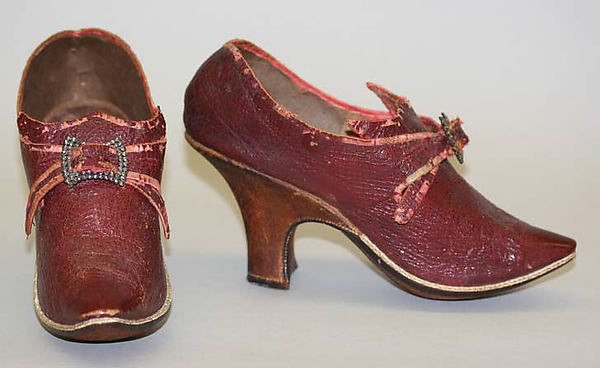
Shoes
A pair of 18th-century shoes in the Metropolitan Museum 
of Art (Accession No.  C.I.63.35.6a, b) have leather, wood, 
and metal components that respond differently to changes 
in humidity and temperature.
So to sum up, Rh and temperature are out to destroy your things. You can invest in special controlled environments for each valuable you own if you have endless funds and don’t mind living in rooms lined with Plexiglas cases, but if you want several things that are not made of the same material to coexist in one comfy living space, the best you can do is to try to keep the Rh as stable as possible, preferably in the Goldilocks zone where it’s not too wet, and not too dry, but juuuust right. 

6)   6)  Pollutants. That’s right, even the air is out to destroy the things you love. Why? Because all of your things are comprised of chemical elements and compounds, and the air contains chemical elements and compounds that are looking for something to bond with. Sometimes the elements in air and the ones that comprise your things are irresistibly attracted to each other. Like soul mates, they bond-- especially if temperature and humidity set the right mood for their romance. Take for example silver and sulfur oxide. They are like Romeo and Juliet. They join together no matter how destructive the results, bonding to create the blackish compound we call tarnish. And here’s the big scary: once that occurs, it can’t really be undone. The Romeo Silver and Juliet Sulfur-dioxide will only be separated in death, because when you remove silver sulfide from the object, it takes the original surface—including some of the silver—away with it.  That’s why frequently-polished silver looks so soft and aged.

There are a lot of pollutants that can cause undesirable chemical reactions like this. These include the oils of your skin (if you have the nerve to touch the things you own), oxygen, which you pretty much can’t live without, and dust, which you generate every day with dead skin cells and hair. Then there are the invisible gasses floating around. If you ever hear museum-types talking about off-gassing, they are not rudely bringing up tummy-troubles, they are talking about how materials like paint and wood and plastic can release gasses into the air over time, and these gasses may contain pollutants. So if you want to protect your things from pollutants, keep them away from people, dust, anything gassy (even if you don't know it's gassy), and air. What could be simpler?
This image of a quilt from welshquilts.blogspot.com shows 
fabric dyes exposed to light will fade over time. The area that
had been covered shows the original reddish color.

7)    Light. Light can cause chemical deterioration and fading in certain materials. Museums often prevent this kind of damage by getting UV filters for overhead lighting and windows. At home you may just want to keep vulnerable materials out of direct sun and make sure your favorite art pieces are framed with UV-filtering glass. Textiles and paper are particularly vulnerable. So lest I gave you the impression that a nice sunny spot was the perfect counter-attack for the mold that might lurk in dark spaces, consider that bubble burst. Sunlight will kill mold, but exposure should be kept to a minimum if you go that route. Paper, for example, will almost always decay at least a little bit in sunlight, so you are sacrificing some stability to kill the mold if you put a moldy paper in the sun. You just have to consider which would harm the paper more, or call in a professional to treat the item.

8)    Inherent vice. Great googely-moogely I hate this one. The concept of inherent vice is this: your object will self-destruct and there ain’t nothin’ you can do about it. Here’s an example you might see regularly: paper made from wood contains compounds like lignin, which are highly acidic. Unless wood-based paper is treated to remove acids, it will literally give itself acid burns until it gets so brittle that it flakes apart. Ever find a newspaper you left around the house for a while? It’s probably yellower than it used to be, right? That’s the acid in action. Your paper’s self-destruct button was activated the minute it came out of production. Doomed. Not only will acidic items burn themselves to death over time, but they can even spread the destruction. A wooden trunk releases acids into the air, exposing anything you store within to an acidic environment, and if you wrap something in newspaper, the acids from that paper can migrate to the item you wrapped in it. Sometimes clothing that has brownish orange spots isn’t stained, it’s actually burned by acid exposure. Other objects may have inherent vice because the chemical bonds that hold them together simply age and break over time. For example, silk and cotton threads start out with pretty long, strong fibers, but over time the bonds in those fibers break. And then there are the composite objects… Take for example the pair of shoes that I mentioned in #5. The leather will need some moisture in its environment or it’ll get too brittle, but moisture may cause the nails in the shoe soles or shoe buckles to corrode. Also, acids in the wood and leather promote metal corrosion. So when you put different materials together into one object, it’s nearly impossible to make the environment perfect for every component, and this is the perfect formula for inherent vice.
This fan, one of the recent finds from Nanny's closet, is an example of a composite object that suffers from inherent vice. Much of its yellowish appearance may have been caused by its storage conditions (wrapped in acidic newspaper in an acidic trunk since the 1940s), but note the brown stains on the sheer fabric of the fan. Since the fan was stored closed, those are not from the wrapping. The fan blades are made of wood though, so acids from the wood may have caused burns on the fabric. Alternatively, the adhesive used to stick the fabric to the blades may be acidic or deteriorating. Early adhesives often include animal products from fish or horses. Basically, this fan's components are harming each other over time.

So what do you do with all of this information? The more you know about the forces that put your favorite collections at risk, the more you can work to avoid them. I'll spend some time in future posts talking about the low-budget approach I've developed to protect my costumes from the agents of deterioration. It should be clear, however, that sometimes there’s not much you can do, especially in home-storage situations. Personally, I had to come to terms with the idea that man-made things, like people, are not immortal. Inanimate objects, including the clothing and accessories I collect, have a limited lifespan, and the more I handle them, the shorter their life will be. Knowing this, I have resolved to care for them as best I can, but I enjoy them as much as I can as well. Ultimately there’s not much point in collecting and preserving things that you never get to see.

Wednesday, March 14, 2012

Document and Distribute!


Our makeshift documentation technique: lay out each 
garment on the bed with a numbered post-it, develop 
film, and scan photos.
In a large family with a lot of heirlooms, I’ve found that documenting what is there and distributing that information to relatives is well worth the effort. In 2000, I traveled to Maine after college graduation and decided that I’d like to revisit some of the old family dresses I had seen over a decade earlier as a child exploring a closet full of mysteries with my Grammy (story here). This time I was armed with a camera, acid-free tissue, and a bit more knowledge about what I was looking at. 

With help from Grammy and a friend, we got the dresses out and laid them on a bed one-by-one for photography. I put a numbered post-it on the bed with each piece before taking the pictures so that later I could make a spreadsheet of information to go with each garment. As we finished, we carefully refolded the dresses and packed them away with acid-free tissue. They were still in trunks and suitcases, not exactly archival quality storage, but at least the tissue helped a little.

After I developed the pictures we took that day, they sat around in several apartments as I went through grad school, got a job, got married, got another job… It was always one of those things I’d get to “eventually.” By the time I finally got motivated to put the photos together into a scrapbook, about five years had passed since I’d actually seen the dresses. That was problematic because I wanted to compile a spreadsheet with information about them, but I didn’t remember as much as I could have about the materials used, the nature of the trims, etc. Still, I assembled a scrapbook with my best guesses about the age and description of each garment, and I took the book to Grammy’s where all of her visitors could see it. Then I scanned each photo and made CDs with images and the spreadsheet for distribution to the family.


After we took pictures, we packed the dresses in trunks 
and suitcases with acid-free tissue. They stayed there 
tucked away in Nanny's closet until 2011 when we had 
to start removing the antiques from Grammy's house.
 I made some mistakes in the book, but the great thing about it is that the family helped me add information and make corrections. For example, one of the dresses was Nanny’s wedding dress. I had gotten the year wrong, as well as the list of aunts who had worn the dress in their weddings. It was easily corrected, and gave my aunts a chance to educate me about our family's history.

For me, the project was fun because it suited my interests perfectly, but I think my family was also grateful because there were things in the book they’d never seen before, and if they had seen the dresses, it sparked happy memories for them about dress-up or the exploration of the “special dresses”.

Now I am grateful that I did the book because it has eased some of the angst of deciding who inherits each garment now that Grammy has passed. We decided to keep the collection together for now, but in order to determine who gets to decide the ultimate disposition of each item, who pays to replace tissue and buy garment boxes, and who can give the okay to use the dresses for education or dress-up, we are determining individual ownership and tracking who owns what on the spreadsheet I generated years ago. The only regret I have is that I didn't document everything. Recent months have taught me that there were a LOT more articles of clothing in that house than I was aware of.  
Who would throw out a broken iron? Not my 
family, apparently.


The rest of the family heirlooms have a similar story. Some were on everyone’s radar, but most items were tucked away in closets, under piles of clutter, or in unlabeled boxes. The distribution of the estate has therefore been a messy process. Many siblings with many different opinions can’t decide by committee who gets every last object; there’s simply too much stuff. Some of it is loaded with sentimental value and some has monetary value, but most would probably have value only to specific niche collectors. For example, behold the collection of irons that turned up.

Thus the importance of the ‘document and distribute’ mantra. If someone has expertise with a specific group of heirlooms, they should get it out there! When family members have knowledge that goes beyond emotional attachments, they can feel more confident that they aren't making poor decisions about what they really want to keep and what they can let go.